
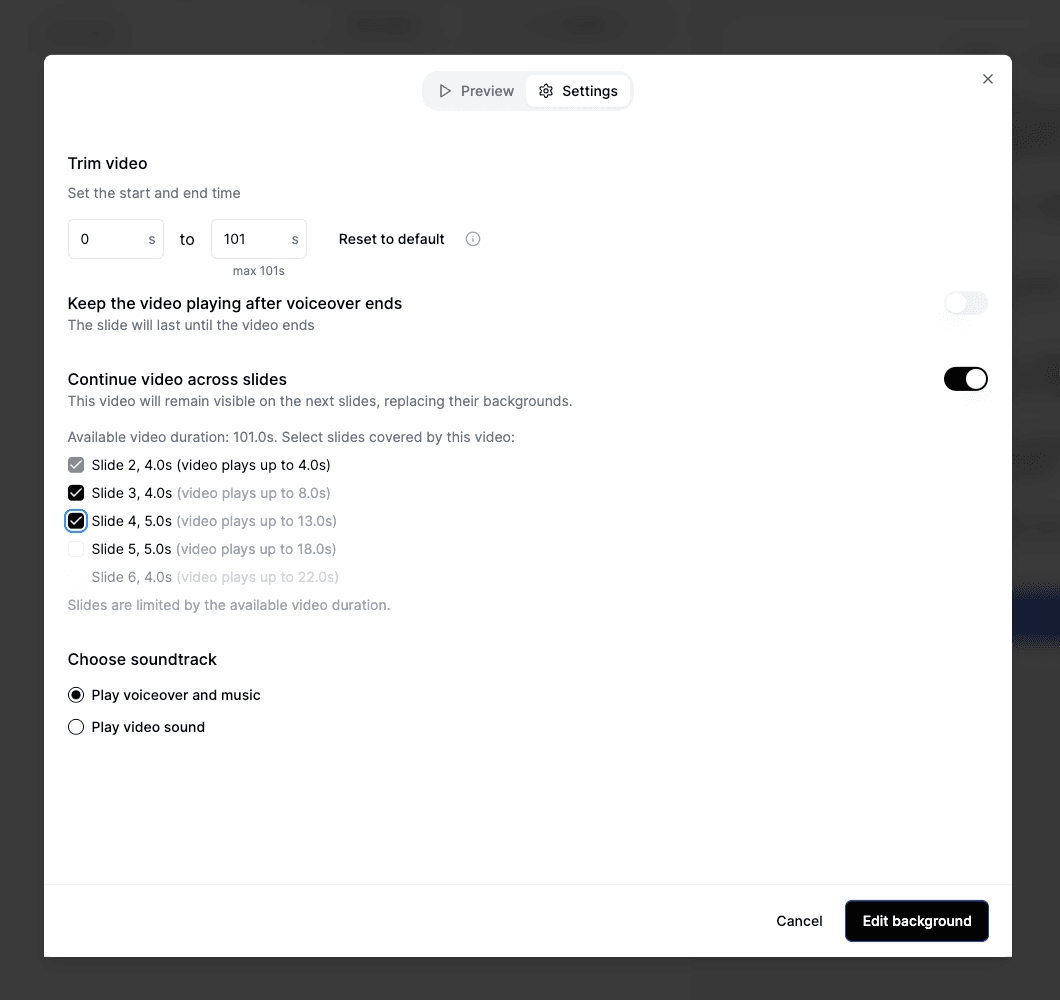
Let one video run across multiple slides
Until now, a video used as a slide background would play only within that single slide. If you wanted a longer moment (a steady crowd shot, a calm skyline, B-roll that should breathe), you had to duplicate the clip or switch backgrounds and accept visible cuts.
With our latest update, you can extend one background video across multiple slides, so it keeps playing seamlessly while your story (overlays, text, voiceover, subtitles) continues slide by slide.
What this is for
Use Continue video across slides when you want:
- a single B-roll shot to cover several points in the script
- a smoother visual flow with fewer hard cuts
- less manual work sourcing backgrounds for every slide
- a consistent mood (weather footage, traffic, stadium, aerials, street scenes)
Step-by-step: how to extend a video across slides
- Add a video as a slide background
Pick the slide where the video should start and set the video as the background. - Open the video settings
In the background editor, click Settings (next to Preview). - Enable the feature
Turn on Continue video across slides. - Select which slides the video should cover
You will see a list of upcoming slides with checkboxes. Tick the slides you want the video to continue through.
Flipatic will also show you how far the clip can go based on the available video duration (so you cannot select more slides than the video can actually cover). - Done - the timeline becomes one continuous clip
The video keeps playing across the selected slides, and those slides are visually linked to the starting slide in the slide list, so it’s clear they share the same background video.

When a video is extended across slides, it replaces the backgrounds of the covered slides.
Those original slide backgrounds are not deleted - they are still there. If you later turn off the setting, those backgrounds will simply show up again.
How to revert back
At any time, go back to Settings and turn off Continue video across slides (or uncheck specific slides).
The covered slides will immediately return to showing their own original backgrounds.
Fit, Fill, or Frame: Choose how your background video is displayed
Background videos come in every possible format. Your final video might be vertical, but your source clip might be 16:9. Or you might have a great shot, but the important action is slightly off-center.
That is why we added three display modes for background videos:
Fit entire video
Fit keeps the entire video visible. If the aspect ratio does not match your output format, you may see empty space (letterboxing), but nothing gets cropped.
Use Fit when:
- you must keep the whole scene visible (maps, wide establishing shots, anything with key content at the edges)
- cropping would cut out important elements
Fill & center
Fill makes the video cover the whole frame. It will crop parts of the video if needed, and keeps the result centered.
Use Fill when:
- you want a clean, edge-to-edge look with no empty space
- the clip is “safe to crop” because the subject is near the center
Frame manually
Frame is Fill with manual control. You still fill the frame, but you can choose which part of the video stays visible. This is perfect when the subject is not centered, or when you want to “reframe” a horizontal clip for a vertical output.
Use Frame when:
- the key action is on the left or right side and auto-centering would miss it
- you want consistent composition across slides (for example, keep a person’s face in the same area)
- you are adapting landscape footage to vertical and need precise control
Step-by-step: switch between Fit, Fill, and Frame
- Select the slide and open the background video settings.
- Choose the display mode: Fit, Fill, or Frame.
- If you pick Frame, adjust the visible area to focus on what matters.
- Preview the slide to make sure the crop feels intentional and stable.